 Before you can insert your images in the text, you obviously have to install them on the server. Using the SPIP system, this is done through the normal graphical interface of the private zone.
SPIP offers you the possibility to illustrate your articles and news items with images. This is achieved in a number of steps: you must first upload the image file to the site, and then insert the image inside the text.
Preparing: Image formats
When you create your images (with your usual application), you will need to save them in one of the following formats:
- GIF; (extension .gif)
- JPEG; (extension .jpg)
- PNG (extension .png).
You should particularly make sure that your files names are created with an extension indicating their format: .gif, .jpg or .png. If you install a file with a missing extension in its name, the system will not know how to use that image file.
Step 1: Installing the images on the server
Before you can insert your images in the text, you obviously have to install them on the server. Using the SPIP system, this is done through the normal graphical interface of the private zone.
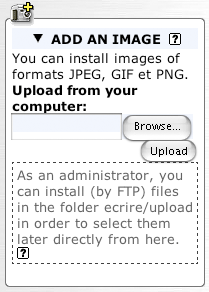
When you “modify” an article or a news item, the left column displays a form labelled: “Add an image”. This is a form with a text field followed by a button labelled (depending on which browser you use) “Browse”, “Select”, “File”...
When you click on this button, a dialogue box opens to allow you to browse your disk resources and select the graphic file you want.
Having done this, you then need to click on the button labelled: “Upload”.
If the operation succeeds, your image will appear in the left column, accompanied by several settings...
Step 2: information concerning your image
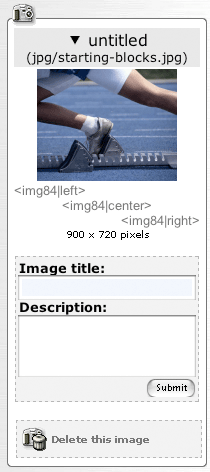 Once your image has been uploaded on the server, a new panel will be displayed on the left of the screen. It contains all the information that relates to that image (part of this information will be hidden by default, so click on the small triangle to “unfold” the information box).
- Thumbnail display. A preview of your image is displayed. If the image is too large (more than 200 pixels wide), a thumbnail of the image is automatically calculated and displayed instead.
- SPIP shortcuts. See below for more information: SPIP will remind you of the 3 “shortcuts” available which enable you to insert this image within your text. It is worth noting that every image is uniquely “numbered” like these examples: “IMG1”, “IMG2”... These “shortcuts” are used in the third step.
- Image size. Just above the image, its width and height (in pixels) are displayed.
- Image title and description. If you want to, you can enter a title and a description for each image, such as an explanation, the photographer’s copyright notice...
- Delete this image. As you can guess, the “Delete this image” button allows you to delete this file if you made a mistake or if you decide you do not want to use the image in the text. It is recommended that you delete unused images to prevent clogging the server with unwanted files.
You can repeat this operation with as many images as you wish (an article or a news item can contain as many images as needed).
Step 3: Inserting an image inside the text
At this stage, the graphic files are now stored on the server, but you now need to indicate where they should be inserted into your text. There is no need to write complicated HTML code for that, as SPIP offers you "shortcuts" to insert your images very easily.
- Images without captions
For each image, look at the 3 shortcuts:
- <img1|left>
- <img1|center>
- <img1|right>
Copy one of these shortcuts (the image number corresponds to the number assigned to the image which is unique for each file), and paste it inside the box labelled “Text” in the position where you want the image to appear. “left” aligns the image to the left, “right” to the right and “center” centres your image in the text.
When the page is displayed, SPIP will replace these shortcuts with the corresponding HTML tags by automatically calculating the dimensions of the images.
- Images with titles and descriptions
If you entered a title and/or a description, the code <img...> is replaced with:
- <doc1|left>
- <doc1|center>
- <doc1|right>
These shortcuts are used in the same way as above; however, when you insert one of these “shortcuts”, SPIP inserts not only the image but also the title and the description that you previously entered. This means that your image will display with whatever explanation, copyright notice, the name of the artist etc. you have previously entered. This information is presented according to the standard "model" for "doc" elements.